This is an ongoing series of posts where I share my learning progress and resources while developing my first 2D Platformer with UE4 and Paper2D. Feel free to help me out if you know some tips & tricks. If you follow along, I would be happy to see your progress – get connected!
Blueprint Components – an introduction
Usually you build a base class with all the functions and behaviors which are common to all derived classes. This is called the object inheritance in OOP development. With components on the other hand we can capsule functions and build a modular system of behaviors. These are not dependent on the owning class/object. Think about it as a shopping cart where you throw in all the abilities this specific blueprint (object / enemy / character) should have.
From the video:
This introduces a way to break the functionality of your games up into a series of modular Blueprintable Components. With this technique, you can quickly construct in-game assets with complex behaviors right inside your game world, just by dragging and dropping!
Please take the time and watch this video from Zak Parrish over at the Epic Unreal Engine Channel about Blueprint Components. They were introduced in Unreal Engine 4.7.
Blueprint Interface for easy communication
Using Blueprint Interfaces gives us the ability to build functions and send calls to other classes without really knowing about their implementation. The interface definition is comparable to a contract which both classes agree to support. That’s why I can send a message to the owning object without having to worry about breaking the game.
My Interface BPI_CanDie includes these method definitions which we will use within our damage component:
- TookDamage
- DieNow
- GotHealed
If the owning class doesn’t implement one of these methods the call just gets ignored but doesn’t break it.
Take Damage Blueprint Component
So let’s get started with the actual structure of the damage component. I hope you watched the video above ;-)
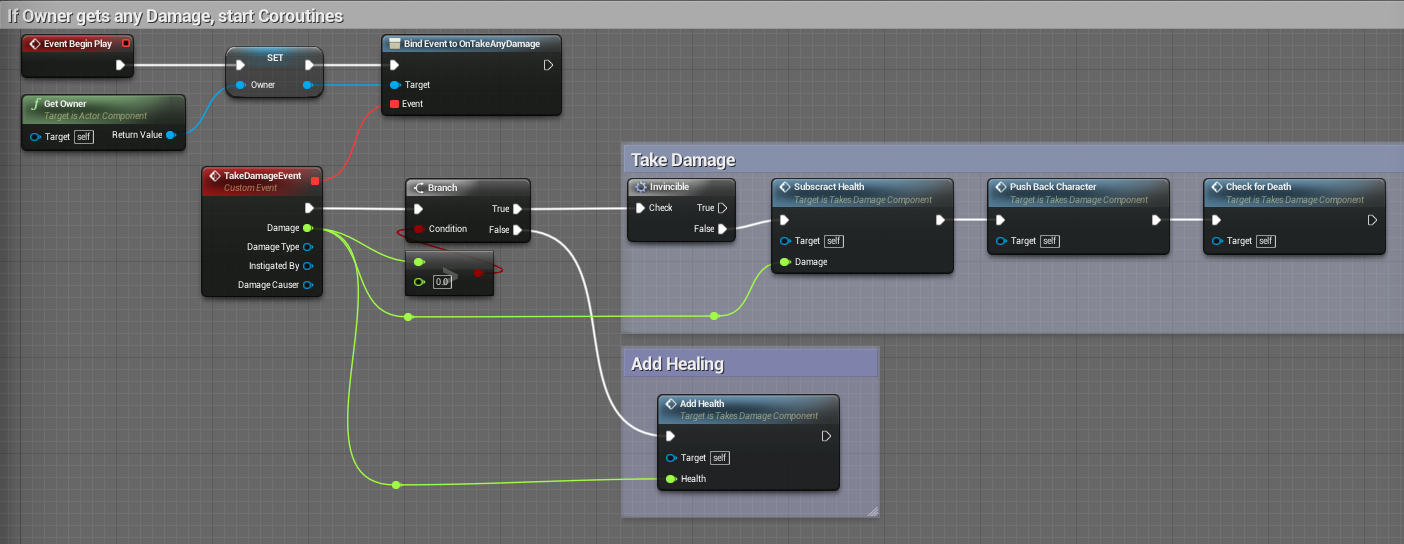
This Component hooks into the OnTakeDamage Event, so it gets called as soon as the owner gets any damage (or health) for example via the ‘apply damage’ node. Have a look at the Deal Damage section of the previous post, if you like to see that node in action.
I check the incoming damage and route negative damage (healing) to another event. If we take damage, the chain works through 4 events:
- Invincible check
- Subtracting Damage from your health
- Push back the character (if activated for owner)
- Check death state
Checking the invincible status and how to push back a character will be part of another post, as I am concentrating on the damage handling in this post.
Taking Damage and checking death
As you will see, this is a really simple ‘subtract damage float from actual health float and set it as new health’ function. At this point we could go a lot deeper and integrate other functions like armor behavior, critical strike multipliers and so on. Just add new events to the chain.
At the end we check if the owner implements the BPI_CanDie Interface and inform it that it took damage. We don’t know or care, what it is going to to with this information (e.g. playing a damage animation). With this defensive programming style we prevent sudden breaks in the game.
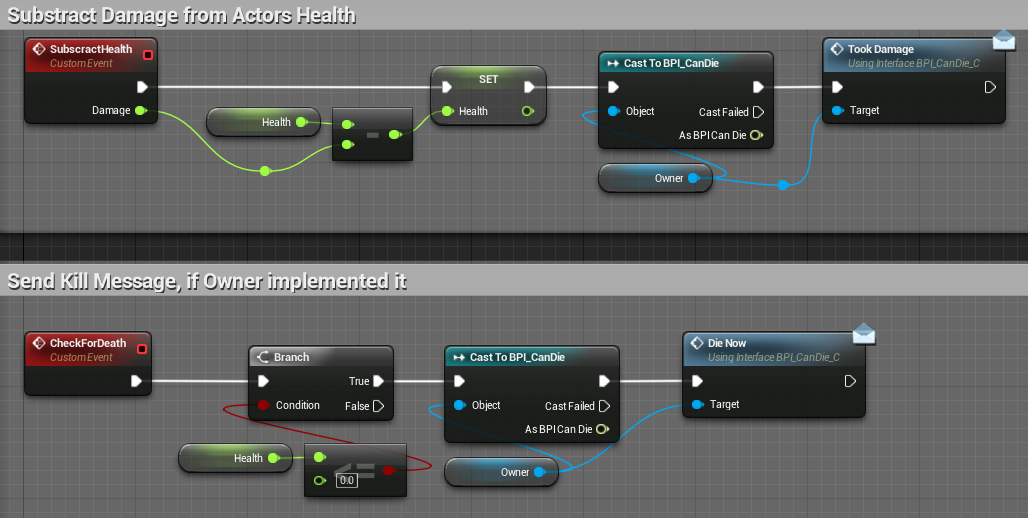
The CheckForDeath methods reports to the owner, if the health went down to zero or below. Again we just send a call to the Interface and let the owner handle that information on its own.
Healing = negative Damage
I was wondering if you can apply a negative damage value to the ‘apply damage’ node. You can, which means we can implement some sort of a healing method. I am using this for my health potions.
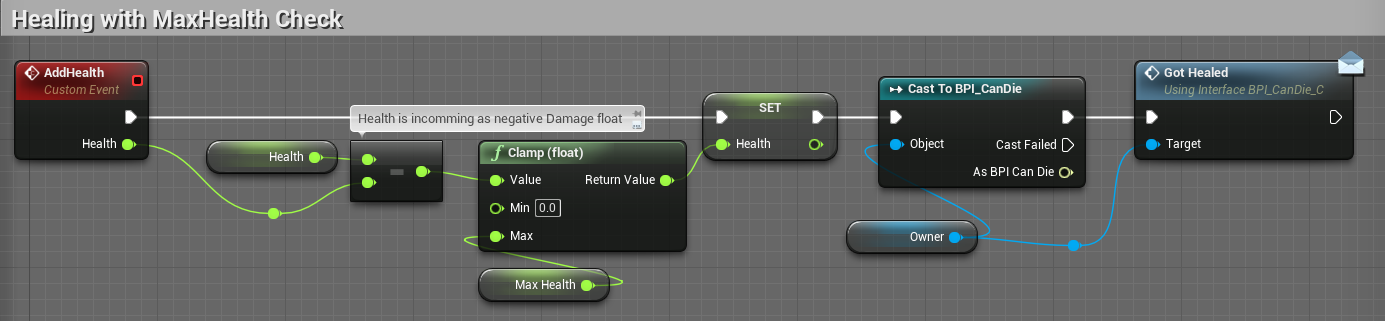
- Subtract the incoming negative ‘damage’ from the health float (which means adding to it)
- clamp the resulting value, so that it doesn’t get above the maximum health value
- set it as new health float
- cast to the BPI_CanDie Interface of the owner and send the ‘GotHealed‘ method
Conclusion
This is one way of developing a damage system, which was mainly a proof of concept for me. I am sure you can do this basic health / death management in a much more simple way directly inside the character / enemy class. But I like the idea of components, which capsulate methods to a specific theme, work on their own and report to interface actions outside their scope. This feels just right for me as a business software developer (at daytime).
I hope you got a little understanding of this fundamental concept with the help of my post. It should get pretty handy in your further development when you try to create a lot more complex functions and game behaviors.
The next post in this series will be about implementing this Blueprint Component into your Player Character and your enemies utilizing the Blueprint Interfaces.
2016-02-13
Well….most of interested parts of tutorial in future….i hope it will be son….including UI and so on… =) Donate button will be helpfull i think
2016-02-13
I am lacking a bit of time to write these reports / tutorials but I really want to continue the 2D platformer blueprints. Feel free to subscribe in my newsletter to get informed right on release :)
2016-04-02
There is already a getOwner function in 4.11, don’t need to create a var. Anyways, thanks.
2016-04-03
You are correct. But it is good practice to save the reference inside your scope, if you need to call it more than once. You don’t know what actions are done behind the getOwner function. This way you can be sure you “build” the reference to it just once :)
2016-05-13
This series could be the thing that convinces me to go all in with UE4 instead of Unity. Thanks for posting. Very curious about future posts. I’m totally subscribing to this!
2017-10-02
Heeey…this is 2017 Already….
Still waiting for u man =)